Updated November 2026 · Free countdown, nothing sent anywhere
See where the Sun will set.Then stay 20 minutes longer.
Phone sunset photos look washed out for six reasons, and the first one is timing. A live countdown to golden hour, sunset and blue hour for wherever you are, then the other five.
Try the paper exposure comparison
Tonight, where you are
Tap to use your location (asked once, kept on your phone), or type a latitude and longitude.
Sun 6° up
Sun on the horizon
Sun 6° down
Times are for today, in your phone's time zone, assuming a flat horizon. Hills and buildings end the light early. Arithmetic follows the NOAA solar equations.
Three ways people chase a sunset
Point and hope
Arrive at sunset, shoot the Sun, leave as it goes. The photo is a white blob over a grey sky, and the best colour happens in the car park.
Edit it later
Pull the saturation up until the sky is a colour that never existed. It looks like it, too.
Plan the light
Know when golden hour starts and when blue hour ends, know which way the Sun goes down from your spot, check the cloud toward it, and expose for the sky. Most of that is timing, and timing is free.
Questions people ask
What is the best time to take sunset photos on a phone?
Two windows: the last 20 minutes before the Sun touches the horizon, for warm light on faces and landscapes, and the 10 to 25 minutes after it goes, for colour in the sky. The second one is the window people miss. The counter on this page gives both for your location.
Why are my sunset photos orange instead of pink?
Usually the phone's automatic white balance warming the whole frame, or you shot too early, when the light is orange, rather than after sunset, when it turns pink. Try a frame with exposure pulled down and one taken fifteen minutes later.
Should I turn HDR off for sunsets?
Try it. HDR keeps detail in both sky and ground, at the cost of contrast. For a sunset, a darker single exposure is often the stronger picture. Not every iPhone lets you switch it off; Apple's settings guide linked above lists what your model has.
How does the countdown know where I am?
Only if you tap the button and allow it. The browser hands the page a rough position, the page does the sun arithmetic itself, and nothing is sent anywhere; there is no server behind this page. You can type a latitude and longitude instead. The times assume a flat horizon.
Does Asterfold take better photos?
No. It is a planner: it draws the Sun's path for your spot and date, lets you aim a first-person horizon at your view with a chosen lens, rates tonight's sunset with reasons, and keeps a journal of what the sky actually did. The camera is still the camera.
Is the app free?
The Studio, aiming and plans for tonight are free, with no account and no analytics. The listing describes an optional Asterfold Plus; we only describe what the listing and screenshots show.
Six reasons, most common first
You shot at sunset, not after it
The sky usually does its best work 10 to 25 minutes after the Sun has gone, when the light is coming up from under the horizon and the high cloud turns pink. Most people photograph the Sun itself, then leave as the colour arrives.
What helps: Stay. Use the timer below: the blue-hour countdown is the window most people walk out of.
The phone exposed for the Sun
A phone camera averages the scene. A bright Sun in frame pulls everything else toward grey and the sky loses its colour.
What helps: Tap the sky away from the Sun, then slide the little sun icon down to darken the shot by a stop or so. On iPhone, holding the tap locks exposure so it stops changing between frames. Apple's camera guide covers the controls.
HDR flattened it
Smart HDR merges a bright and a dark exposure so you can see both the sky and the ground. That is clever, and it is also why the sky looks like a postcard from 1994: the contrast that made it dramatic has been averaged away.
What helps: Shoot a second frame with the exposure pulled down, as above, and compare. On some iPhones you can turn Smart HDR off in Settings, Camera; the Apple page below says which.
You pointed at the Sun
The most saturated colour at sunset is often behind you: the pink band above the eastern horizon (the Belt of Venus) and the warm light on the land. Facing the Sun gives you a white blob and a silhouette.
What helps: Turn around for one frame. Then shoot the view you came for.
Low cloud on the horizon ate the light
Thin, high cloud makes a sunset. A bank of low cloud 60 to 180 km away in the direction of the Sun cuts the light before it gets warm, and no camera setting fixes that.
What helps: Check the forecast toward the setting Sun earlier in the day. Asterfold shows point forecasts 60 and 180 km toward the Sun for tonight, from MET Norway, with a plain-English rating.
Haze and the wrong season
Summer haze scatters the light into a pale wash; clear, cold, dry air after a front has passed gives the deep reds. Latitude matters too: near the equator the whole thing is over in minutes.
What helps: Watch for the day after rain. And lower your expectations in a July heatwave; it is not the phone.
Apple's advanced camera settings guide lists the HDR and format options for each iPhone. The sun times on this page use the NOAA solar calculator equations, and Asterfold's cloud forecasts come from MET Norway.
Compare two sunset exposures
Pick one feature you want to see, such as a band of pink cloud or the edge of a tree. Take a reference photo. Without moving the camera, take a darker frame. If your camera offers a brightness or exposure control, use it to change the second frame. A third, lighter frame is optional.
Download the exposure comparison sheet (PDF, 1 page)
Use the exercise without printing
- Note the scene, the edge that anchors your framing, and the detail you want to preserve.
- For each exposure write its file name or number, the setting if known, the bright sky detail you can see, and the dark subject detail you can see.
- Choose reference, darker, lighter, or none yet. Describe what the others lost. Write one thing to try on a return visit.
Example: The darker frame kept the pink cloud edge but lost the bark texture. It works for a silhouette. If the bark matters more, try framing the tree against a smaller patch of sky next time.
Nikon’s guide to comparing exposures explains the technique.
How Asterfold fits, in three steps
- Save the spot you shoot from. The sky dome draws the Sun's real path for that place and date, coloured by golden hour, blue hour and twilight, calculated on the phone so it works with no signal.
- Aim your view. Turn toward your shot on a first-person horizon, pick your lens or the phone camera, and see whether the Sun lands in the frame tonight, and on which dates this year it will.
- Check tonight. Sunset, stars and sunrise ratings with plain reasons, hour-by-hour cloud, and the two point forecasts toward the setting Sun. Afterwards, rate what you saw in two taps so the ratings learn your own sky.
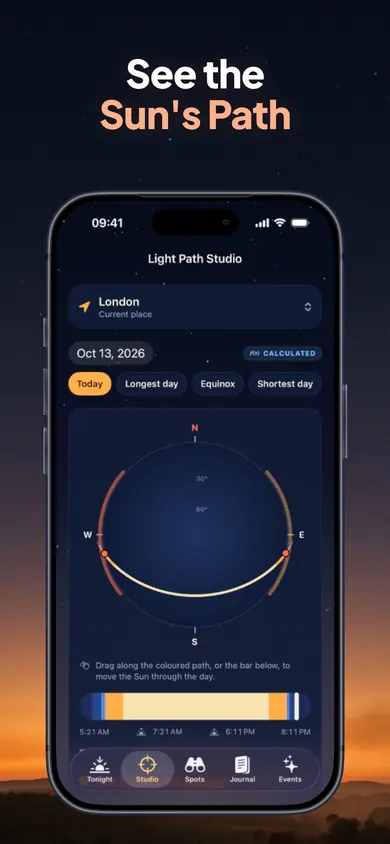
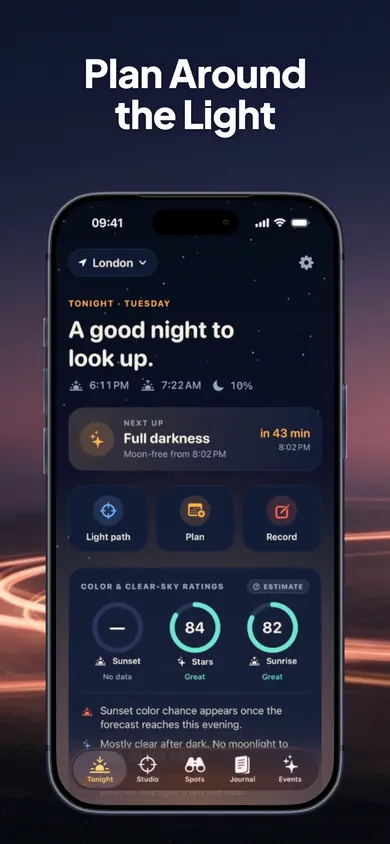
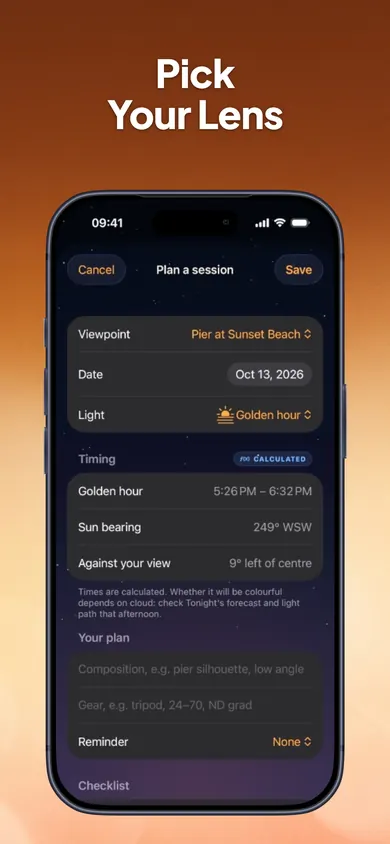
Honest limits: the countdown and the app both assume a flat horizon, and a rating is a rule-of-thumb estimate, not a promise. Neither will make a hazy July evening into October.
Stay for the blue hour.
Free on iPhone. Works offline, no account, no analytics.
- How to plan a sunset proposal: a timing sheetSort the evening into order, then print a one-page sunset proposal run sheet: arrive-by time, the ask, where the photographer stands, the cloud check.
- Golden hour vs blue hour: a winter glossary for hikersGolden hour vs blue hour, civil twilight, headlamp time and the other words a winter sunset hike needs, plus a free calculator for your date and place.
- How to find where the Sun sets from your window: 3 methodsHow to find where the sun sets from a window or balcony: three taps pick a method (watch and mark, compass rule, or a sunset planner) and estimate sunset bearings for a latitude band.
- Sunset Departure Planner: Work Backward from the LightEnter your sunset time, travel, setup and desired lead time to calculate when to leave, arrive and be ready. Free planning arithmetic.